Manage benchmark results#
Description of the benchmark results DataFrame#
Once the benchmark is run, the results are stored as a pd.DataFrame in a
.parquet file, located in a directory ./outputs in the benchmark
directory, with a .parquet file.
By default, the name of the file include the date and time of the run,
as benchopt_run_<date>_<time>.parquet but a custom name can be given using
the --output option of benchopt run.
The DataFrame contains the following columns:
objective_name|solver_name|data_name: the names of the different benchopt components used for this line.obj_description|solver_description: A more verbose description of the objective and solver, displayed in the HTML page.p_obj_p: the value of the objective’s parameterp.p_solver_p: the value of the solver’s parameterp.p_dateset_p: the value of the dataset’s parameterp.time: the time taken to run the solver until this point of the performance curve.stop_val: the number of iterations or the tolerance reached by the solver.idx_rep: If multiple repetitions are run for each solver with--n-rep, this column contains the repetition number.sampling_strategy: The sampling strategy used to generate the performance curve of this solver. This allow to adapt the plot in the HTML depending on each solver.objective_k: The value associated to the keykin theObjective.evaluate_resultdictionary.
The remaining columns are informations about the system used to run the
benchmark, with keys {'env_OMP_NUM_THREADS', 'platform', 'platform-architecture', 'platform-release', 'platform-version', 'system-cpus', 'system-processor', 'system-ram (GB)', 'version-cuda', 'version-numpy', 'version-scipy', 'benchmark-git-tag'}.
Collect benchmark results#
The result file is produced only once the full benchmark has been run.
When the benchmark is run in parallel, the results that have already been
computed can be collected using the --collect option with
benchopt run. Adding this option with the same command line will
produce a parquet file with all the results that have been computed so far.
Clean benchmark results#
The results and cache of previously run benchmark can be cleaned using the
benchopt clean command. This command will remove the ./results and
./__cache__ directories in the benchmark directory.
Publish benchmark results#
Benchopt allows you to publish your benchmark results to
the Benchopt Benchmarks website
with one command benchopt publish.
The publish command will send your results to GitHub by opening
a pull-request on the Benchopt results repository.
Once the pull-request is merged it will appear automatically online.
Workflow example:
$ git clone https://github.com/benchopt/benchmark_logreg_l2
$ benchopt run ./benchmark_logreg_l2
$ benchopt publish ./benchmark_logreg_l2 -t <GITHUB_TOKEN>
You see that to publish you need to specify the value of <GITHUB_TOKEN>.
This GitHub access token contains 40 alphanumeric characters that allow GitHub
to identify you and use your account.
After getting your personal token as explained below the last
line will read something like:
$ benchopt publish ./benchmark_logreg_l2 -t 1gdgfej73i72if0852a685ejbhb1930ch496cda4
Warning
Your GitHub access token is a sensitive information. Keep it secret as it is as powerful as your GitHub password!
Let’s now see how to create your personal GitHub token.
Obtaining a GitHub token#
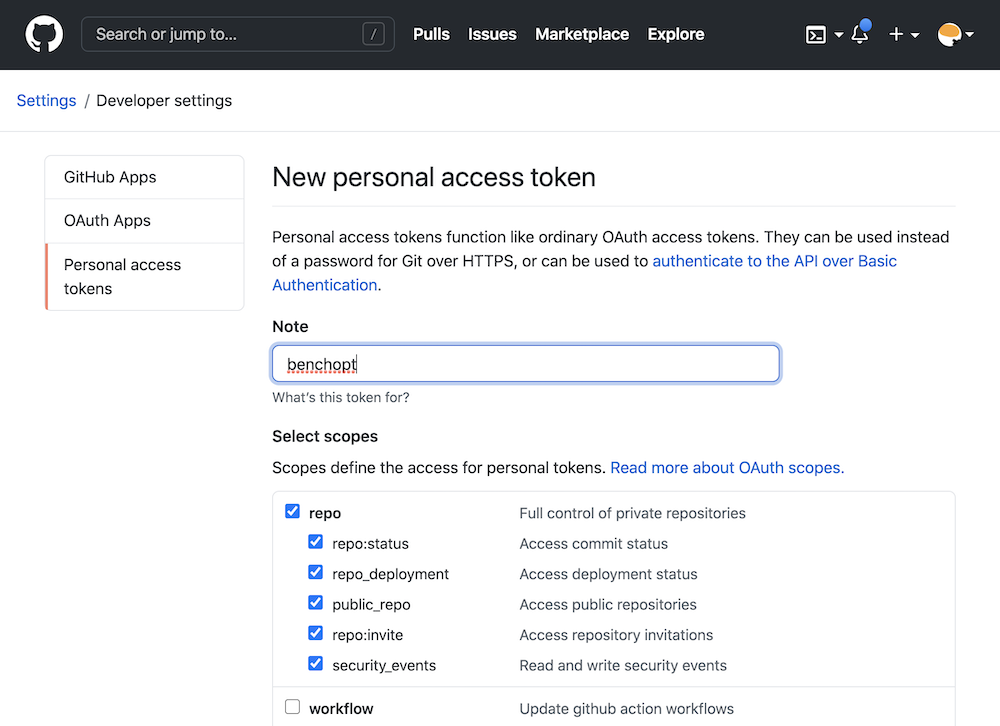
Visit settings/tokens
and click on generate new token.
Then create a token named benchopt, ticking the repo box as shown below:

Then click on generate token and copy this token of 40 characters in a
secure location. Note that the token can be stored in a config file for benchopt
using benchopt config set github_token <TOKEN>. More info on config files can
be found in config_doc.
